

Installation
Flux installs one way, on your computer or on a server (#1471, founder
decision 5): download a release, check it, unpack it and run ./flux up. The release is a folder with the flux launcher and
the Compose files it runs; ./flux up pulls that release’s images, pinned by digest, and sets everything up: the secrets, the
push keys, HTTPS for an https address, calls when you switch them on, and the agent runtime. It keeps its settings in
docker/.env and gives you backups, restores and upgrades as single commands. Nothing is
built on your machine. (Building Flux from its source is the Flux developers’ path: development.)
This page is a fresh installation. v0.2 does not upgrade a v0.1 installation (v0.1 had no users): if this host already runs v0.1, read why and what to do first.
Check the requirements first: a Linux host with Docker Engine 25 or newer and the Compose plugin,
curl (or wget) and tar, 4 GB of memory, and a DNS name pointing at the host. The images are built for linux/amd64;
linux/arm64 is planned (#833).
Production installation
Section titled “Production installation”The example uses /srv/flux and https://flux.example.org; replace both.
1. Download the release and start once on loopback
Section titled “1. Download the release and start once on loopback”cd /srv # the release unpacks into /srv/fluxfor f in flux.tar.gz SHA256SUMS SHA256SUMS.sigstore.json; do curl -fLO "https://github.com/ColdPhase/flux/releases/latest/download/$f"done# SHA256SUMS must be signed by Flux's release workflow (the official cosign image, pinned by digest; prints: Verified OK)docker run --rm --read-only --cap-drop ALL --security-opt no-new-privileges --user "$(id -u):$(id -g)" -e HOME=/tmp --tmpfs /tmp \ -v "$PWD/SHA256SUMS:/verify/SHA256SUMS:ro,z" -v "$PWD/SHA256SUMS.sigstore.json:/verify/SHA256SUMS.sigstore.json:ro,z" \ ghcr.io/sigstore/cosign/cosign:v3.0.6@sha256:de9c65609e6bde17e6b48de485ee788407c9502fa08b8f4459f595b21f56cd00 \ verify-blob --bundle /verify/SHA256SUMS.sigstore.json \ --certificate-identity https://github.com/ColdPhase/flux/.github/workflows/final-release.yml@refs/heads/main \ --certificate-oidc-issuer https://token.actions.githubusercontent.com /verify/SHA256SUMSsha256sum --ignore-missing -c SHA256SUMS # must print: flux.tar.gz: OKtar -xzf flux.tar.gzcd flux./flux upThe docker run line is the check ./flux upgrade makes on every later release (signatures): it gives
the cosign container only the two files, read-only. Do not go on if it does not print Verified OK. On macOS, check the
checksum with shasum -a 256 --ignore-missing -c SHA256SUMS. A different version is under releases/download/<version>/
instead of releases/latest/download/.
The first ./flux up creates docker/.env with new random secrets and push keys, downloads the images of this release (a
few minutes the first time; docker/release.env names them), runs the migrations, starts the services and prints
http://127.0.0.1:8081. In a terminal it also asks once whether people may sign in with their own ChatGPT and Claude
subscriptions; the agent runtime guide explains the choice. ./flux ai on asks again after n, or to add
Claude Code, but it never takes Codex away: to undo an Enter, set FLUX_AGENT_RUNTIME=pi in docker/.env (API-key agents only)
and run ./flux up. Start with another port if 8081 is taken: FLUX_PORT=8090 ./flux up. To look around on your own
computer, ./flux demo adds a sample company and prints two logins (it refuses a public address).
Check that it answers:
curl -fsS http://127.0.0.1:8081/api/v1/health # {"status":"ok","schemaVersion":…}The setup link. While no company exists, ./flux up ends by printing a link like
http://127.0.0.1:8081/setup#4f0c… (decision F-044, #1471). Only that link makes the first
account, which becomes the company’s owner with every space: its token, FLUX_SETUP_TOKEN in docker/.env, is in nobody else’s
hands. Every later account comes from an invite link that an owner or admin makes, or from single sign-on. You can create the owner’s
account now (on a server, through an SSH tunnel: ssh -L 8081:127.0.0.1:8081 you@server) or after step 3 on the public
address: ./flux up prints the link with the address it has, each time, until the company exists.
Do not run ./flux demo on a server: it creates accounts with printed passwords, and it refuses a
non-loopback origin unless forced.
2. Set the public address and email
Section titled “2. Set the public address and email”Edit docker/.env (it is private, mode 600; keep it that way):
FLUX_PUBLIC_ORIGIN=https://flux.example.orgFLUX_SMTP_URL=smtps://flux:app-password@mail.example.org:465FLUX_MAIL_FROM=Flux <flux@example.org>FLUX_PUBLIC_ORIGIN must be exactly the address people type, with https and no path. Flux refuses
any non-loopback http origin. Every other setting is in the configuration reference.
Email is optional. Without it, people still get a new password from a reset link that an owner or admin
makes in Settings › Company, and you get one for any account, your own too, with ./flux reset-link <email> on the server. In the SMTP URL,
percent-encode special characters of the user name and password (@ is %40, / is %2F). Use
smtps://…:465 or smtp://…:587?requireTLS=true; plain smtp:// without TLS is only for a mail
relay on a trusted network.
Apply the change:
./flux up./flux up never overwrites docker/.env; it recreates the containers whose settings changed.
3. HTTPS: point the DNS name at the server
Section titled “3. HTTPS: point the DNS name at the server”HTTPS is built in (#1471). Because the origin in step 2 is
https, ./flux up also starts a bundled, pinned Caddy on ports 80 and 443 that gets and renews the
certificate for flux.example.org itself and passes everything to the API, which stays on
127.0.0.1:8081. The API trusts exactly Caddy’s address, so sign-in limits and session lists see real
client addresses; ./flux up prints that address.
Your part is DNS: an A record for flux.example.org pointing at the server, and inbound 80/tcp and
443/tcp open to it. Add no AAAA record unless Docker on the server has IPv6 networking enabled (see the
guide). Caddy retries until the name resolves, so the order
does not matter. The details, and how to keep a proxy of your own
instead (the same file, with its address in FLUX_TRUSTED_PROXIES), are in the
reverse proxy guide.
4. Create your account and check mail
Section titled “4. Create your account and check mail”Open the setup link that ./flux up printed (run it again to see it with the public address) and create the owner’s
account, or sign in with the one you made in step 1. A Flux with no company opens on Set up Flux by itself; without
the link’s token it makes no account. The owner has the default space Everyone; everyone else joins by an invite link
from an owner or admin (or by signing in, with single sign-on). Spaces are added from New › Space. The password
needs 12 to 128 characters.

The sign-up page, in the light and the dark theme your browser asks for.
Check that email works:
curl -fsS https://flux.example.org/api/v1/auth/capabilities# {"passwordReset":"available","setup":false,"signup":"link",…}passwordReset must be available. Then sign out, choose Forgot password with your own address
and check that the mail arrives. A send that fails is logged by the API as Password reset mail failed, with the SMTP server’s answer.
5. Who can create an account
Section titled “5. Who can create an account”Nobody can create an account on their own (decision F-044, #1471). An account comes from:
| Way in | Who makes it | What happens |
|---|---|---|
| The setup link | ./flux up, while no company exists |
The first account; it sets up the company and is its owner. |
| An invite link | An owner or admin, in Settings › Company (administration) | Always lets the person create an account, with the address filled in when the link is for one, and joins them with the link’s role. One link, one person. |
| Single sign-on | Your identity provider (single sign-on) | Everyone your provider lets in gets an account and joins as a member on their first sign-in; there are no invite links then. |
One Flux is one company. Inside it, a person sees only the spaces they were added to, and the default space Everyone.
A forgotten password is a reset link: Forgot password mails one when the server has email, an owner or admin
makes one next to the person in Settings › Company and sends it themselves, and ./flux reset-link <email> prints
one for any account, the owner’s too. A link works once and for FLUX_PASSWORD_RESET_TTL_SECONDS (one hour); a newer
link or a changed password stops it.
After you sign up you are the company’s owner, in the default space Everyone. Make your first space with New › Space: a name, the people (chosen from the company) and an AI switch that starts on. To bring in the rest of the team, open Settings › Company and use Invite with a link (administration).
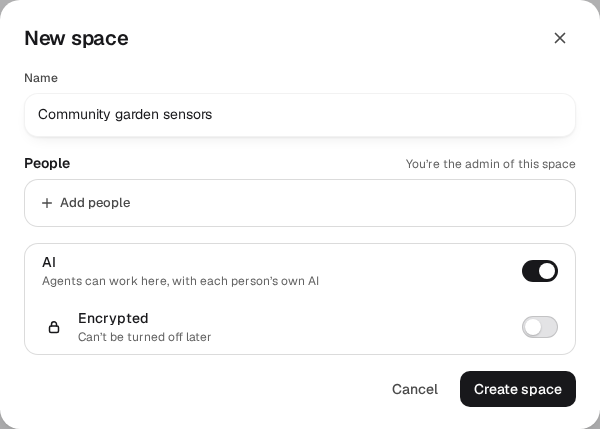
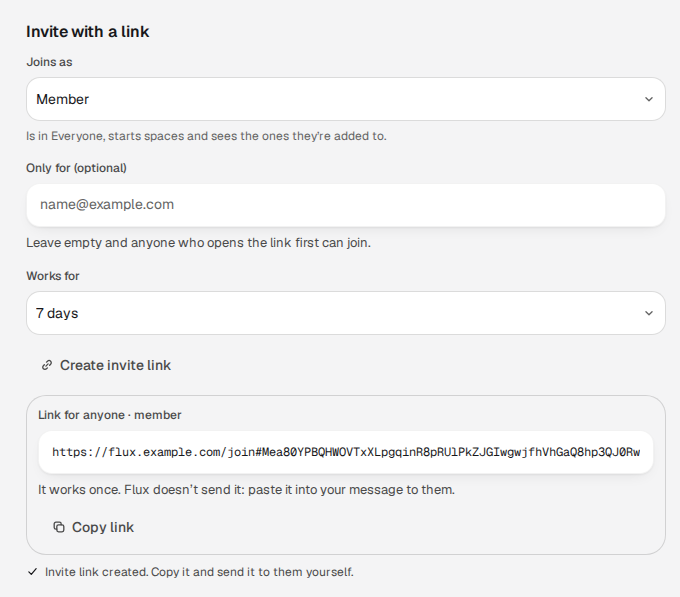
The New space window, and an invite link made in Settings › Company.
6. Finish the server
Section titled “6. Finish the server”- Backups. Add the daily
./flux backup --keep 14cron entry from backup and restore and copy archives off the machine. Also copy the AI key file, which is not in the archive:./flux upprinted its path (~/.local/state/flux/<project>/background.key, named byFLUX_BACKGROUND_KEY_HOST_FILEindocker/.env). Without it, a restore on another machine stops until you copy the file there or start a new key, and then people connect their API keys again (the AI key file). - Push notifications.
./flux upgenerated the VAPID keys. The contact the push services get is your publichttps://address, so iPhone and iPad work onceFLUX_PUBLIC_ORIGINis that address and you have run./flux upagain; there is nothing else to set (phones, tablets and push). - Monitoring. Watch
/api/v1/healthand the containers’ health (monitoring). - Hardening. Go through the hardening checklist.
Private network or home lab
Section titled “Private network or home lab”Without public DNS there is no public certificate. Use an internal name (for example flux.home.arpa
in your router’s DNS; *.internal, *.local and an IP address work the same way) and set
FLUX_PUBLIC_ORIGIN=https://flux.home.arpa: the bundled Caddy then issues the certificate from its own
certificate authority, with nothing else to set. Every device that opens Flux must trust that
authority’s root certificate once: copy it out with
docker cp <FLUX_PROJECT>-proxy-1:/data/caddy/pki/authorities/local/root.crt flux-root.crt and install
it as a trusted root on each computer, phone and tablet. Phones need it trusted for the installed app
and push. A certificate from your own CA works through your own proxy.
Calls and screen sharing
Section titled “Calls and screen sharing”Set FLUX_CALLS=on in docker/.env and run ./flux up: it starts the media server, writes its key and
secret, takes the media address from the origin’s DNS name and prints the ports to open
(7881/tcp, 7882/udp, 3478/udp). See calls.
Without internet access
Section titled “Without internet access”./flux up downloads only the images this Docker does not have yet, and each is pinned by digest. On a server without access
to ghcr.io, copy them there once: on a machine with access, docker pull each image that docker/release.env names (the
agent runtime’s only if you switch it on) and docker save them into one file; on the server, docker load that file, then run
./flux up. The same works for the pinned images of the optional overlays (docker/compose.https.yaml, compose.live.yaml,
compose.embeddings.yaml).
Kubernetes
Section titled “Kubernetes”Kubernetes (including k3s and Helm) is not supported yet (founder decision, 2026-10-31): Docker Compose
on one host is the only supported install. The design assumes one host: the keyring must be
exactly one per deployment and share a private network with api and worker only, the containers
need memory limits that forbid swap, and the files volume is shared by api and worker
(architecture).